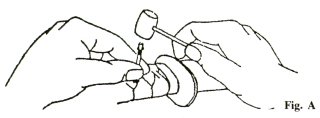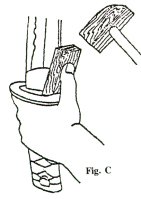
 STEP 1-Removal of the retaining peg. The peg is normally located approximately 1 1/2" form the hand guard and between the lacing crossover. To remove it, simply place a small dirt punch, (brass only), on the small end of the retaining peg, a sharp tap should dislodge it. (Figure A)  Step 3 If the above fails proceed as indicated in Figure C, utilizing a wooden hammer and block, (plastic or Nylon is also accepted), be very careful not to place the drive block on the hand guard itself, it should rest on the spacer. Never use a metal hammer or place the blade in a vice, this will in all probability ruin your sword. (An expensive lesson) |
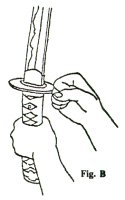
 Step 2-Removal of handle. After the removal of the retaining peg has been accomplished, one should grasp the handle with the left hand, (as illustrated). Holding the sword in an upright (point up) position. with the cutting edge away from the body, strike the left wrist area with the right hand. This should loosen the handle and enable it to be easily removed.  Step 4 Now that the handle has been removed, proceed with the removal of the hand guard and collar (figure D). They slide off in the same direction as did the handle. |
Step 5
Take digital images of the blade and tang area (whether you see an inscription or not).
How to make rubbing w/ out our pressure sensitive paper
Samuraisword.com
P.O. Box 2641
La Crosse, WI 54602 U.S.A.
1(608)-315-0083
P.S. A clear photograph would be most helpful. (Please, do not send videos.) All offerings will be held in the strictest confidence. Recommended reading material:
Official Price guide to Military Collectables (published by Random House),
The Art
s of the Japanese Sword (by B. W. Robinson).
(i.e. porcelain, paintings, lacquer work, etc.)
Sword Evaluation - page three | E-mail us with your questions